| 1. |
Application
The
OPECL series of products, type TOM-500 and TOM-1000, are designed for
automatic adjustment of the optimal oil lubrication level within a
bearing housing, gear box, crank case or similar oil bath application.
They
effectively solve the problem of adjusting the correct oil level
during running conditions rather than during stand-still.
Furthermore, they will automatically compensate for oil leakage and offer
the possibility for visual inspection of the oil level.
The oil leveller will not compensate if the oil level is too high.
|
| 2. |
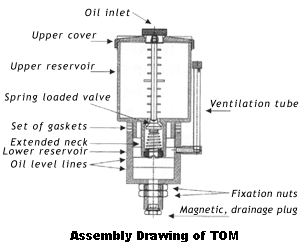
Description
The oil leveller basically consists of two communicating oil
reservoirs, one on top of the other.
The lower reservoir is in direct contact with the application and hence
its oil level is the same as the oil level inside the application. Through
a ventilation tube the lower reservoir is in direct contact with the
ambient air.
|
|
|
| 3. |
Technical data
Boundary dimensions
-TOM-500
-TOM-1000
Reservoir volume
-TOM-500
-TOM-1000
Container material
Temperature range permitted
Permissible humidity
Length of connecting tube
Connection thread
Tube material
O-ring material
Gaskets
Other material
Suitable oil types |
Ø 91mm x 290mm high (3.6 x
11.4in)
Ø 122mm x 290mm high (4.8 x 11.4 in)
500 ml(17 fl. oz. US)
1000 ml(43 fl. oz. US)
Polycarbonate
-20 .. 125 ºC(-5 .. 255 ºF)
0 - 100%
540mm (1.8 feet)
G 1/2
Polyurethane
NBR - 70 Shore
NBR - 80 Shore
6 pieces, 3 pcs 3 x 64.5 x 82.5mm
2 pcs 2 x 64.5 x 82.5mm
1 pcs 2 x 62.5 x 82.5mm
Aluminum, Bronze, Stainless Steel
Mineral and synthetic oils |
|
| 4. |
Instruction
for installation
| 4.1
|
|
Instruction
for installation
|
| 1. |
|
Determine the required oil level in the application
during operation. For oil lubricated bearing housing this is normally
defined as two millimeters (0,08 in ) above he inner diameter of the outer
ring of the bearing. It is however, strongly advised to check the
recommendations from the bearing manufacturer. Similar recommendations
exist for gear boxes and crank shaft casings.
|
| 2. |
|
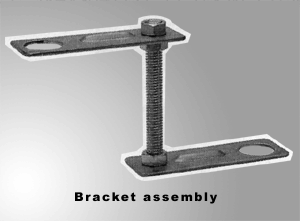
Determine the best location for the
installation of the support bracket assembly. The The Oil Monitor (TOM)
must not be more than 54 cm (1.8 feet, length of plastic tube )
from the application.
|
|
|
| 3. |
|
Adjust the support bracket which holds the oil
leveller to approximately 50 mm (2 in) below the required oil level.
|
| 4. |
|
Separate the lower and the upper reservoirs from each
other.
|
| 5. |
|
Connect the lower reservoir to the support bracket by
means of the two fixation nuts at the bottom of the oil leveller.
|
| 6. |
|
Adjust the height of the oil leveller so that the
required oil level is between the two lines marked on the lower
reservoir.
|
| 7. |
|
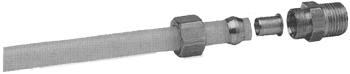
Measure and cut the plastic tube to the adequate
length.
|
| 8. |
|
Prepare both ends of the tube with the swivel
connectors. Start by sliding the swivel adapter (with the thread facing
outwards) on top of the tube. Insert the copper sleeve into the tube and
slide the copper ring on top of the sleeve.
|
|

|
| 9. |
|
Thread the two connection couplings (G 1/2) onto the
oil leveller and the application and connect the tube. Firmly tighten the
swivel adapters.
|
| 10. |
|
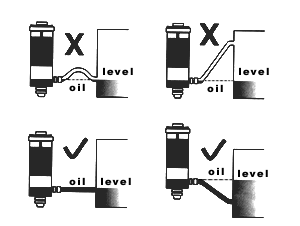
Ensure there are no bends or kinks in the tube
preventing the oil to flow freely from the The Oil Monitor (TOM) to the
application.
|
|
|
| 11. |
|
Adjust the oil level in the application to the
required level and assure that this corresponds to a level between the
lines marked on the lower reservoir. If necessary, adjust the height of
the lower reservoir by means of the support bracket screw.
|
| 12. |
|
Screw the upper reservoir tightly onto the lower
reservoir ensuring that the extended neck is flush with the oil level in
the lower reservoir. Use the six rubber gaskets to obtain the correct
height. (Ensure the gasket with the smallest bore remains on top).
|
| 13. |
|
For high precision applications use the support
bracket screw for the fine tuning (otherwise the accuracy will
depend on the thickness of the gaskets ).
|
| 14. |
|
Unscrew the cover of the upper reservoir and fill it
with the same oil as used in the application.
|
| 15. |
|
Screw back the cover of the upper reservoir and fill
it with the same oil as used in the application.
|
| 16. |
|
Start the machine.
As the oil in the application will lower due to splashing, oil will flow
from the lower reservoir into the application, exposing the extended
neck to open air. This will allow air to enter the upper reservoir and
hence oil to flow down to the lower reservoir.
Once the oil has reached the preset level, air can no longer pass to the
upper reservoir, effectively stopping the flow of oil.
|
| N.B |
|
During stand-still the oil will
stop splashing and the level in the application will rise. As a
consequence the oil level in the oil leveller will also rise
above the preset level.
|
|
| 5. |
Maintenance and trouble shooting
|
5.1
|
|
Maintenance
|
|
|
Regularly: |
|
|
● |
Check and refill the upper oil reservoir with new, clean oil.
|
|
|
● |
Clean the The Oil Monitor (TOM). For this purpose the lower reservoir is
equipped with a drainage neck with a magnetic plug.
|
|
5.2
|
|
Trouble shooting
|
|
|
In case of different oil
levels in the application and the The Oil Monitor (TOM) check that: |
|
|
● |
The application is provided with a ventilation nipple preventing
over/under pressure
|
|
|
● |
The ventilation tube of the The Oil Monitor (TOM) is not clogged.
|
|
|
In the case the oil
continues to flow from the upper reservoir despite the pre-set
level having been reached: |
|
|
● |
Ensure the cover and the oil inlet on
the upper reservoir is properly sealed. |
|
|
In the case of excessive
oil consumption check the application for leakage.
|
|
5.3
|
|
Spare parts |
|
|
|
Designation
TOM
500-1
TOM
1000-1
TOM-1
TOM-2 |
Description
Upper reservoir with gaskets, 500ml
Upper reservoir with gaskets, 1000ml
Lower container with ventilation tube and gaskets
Lubrication tube with end fittings (1 m) |
|
|
|
|
|
|
|